Monday, June 15, 2015

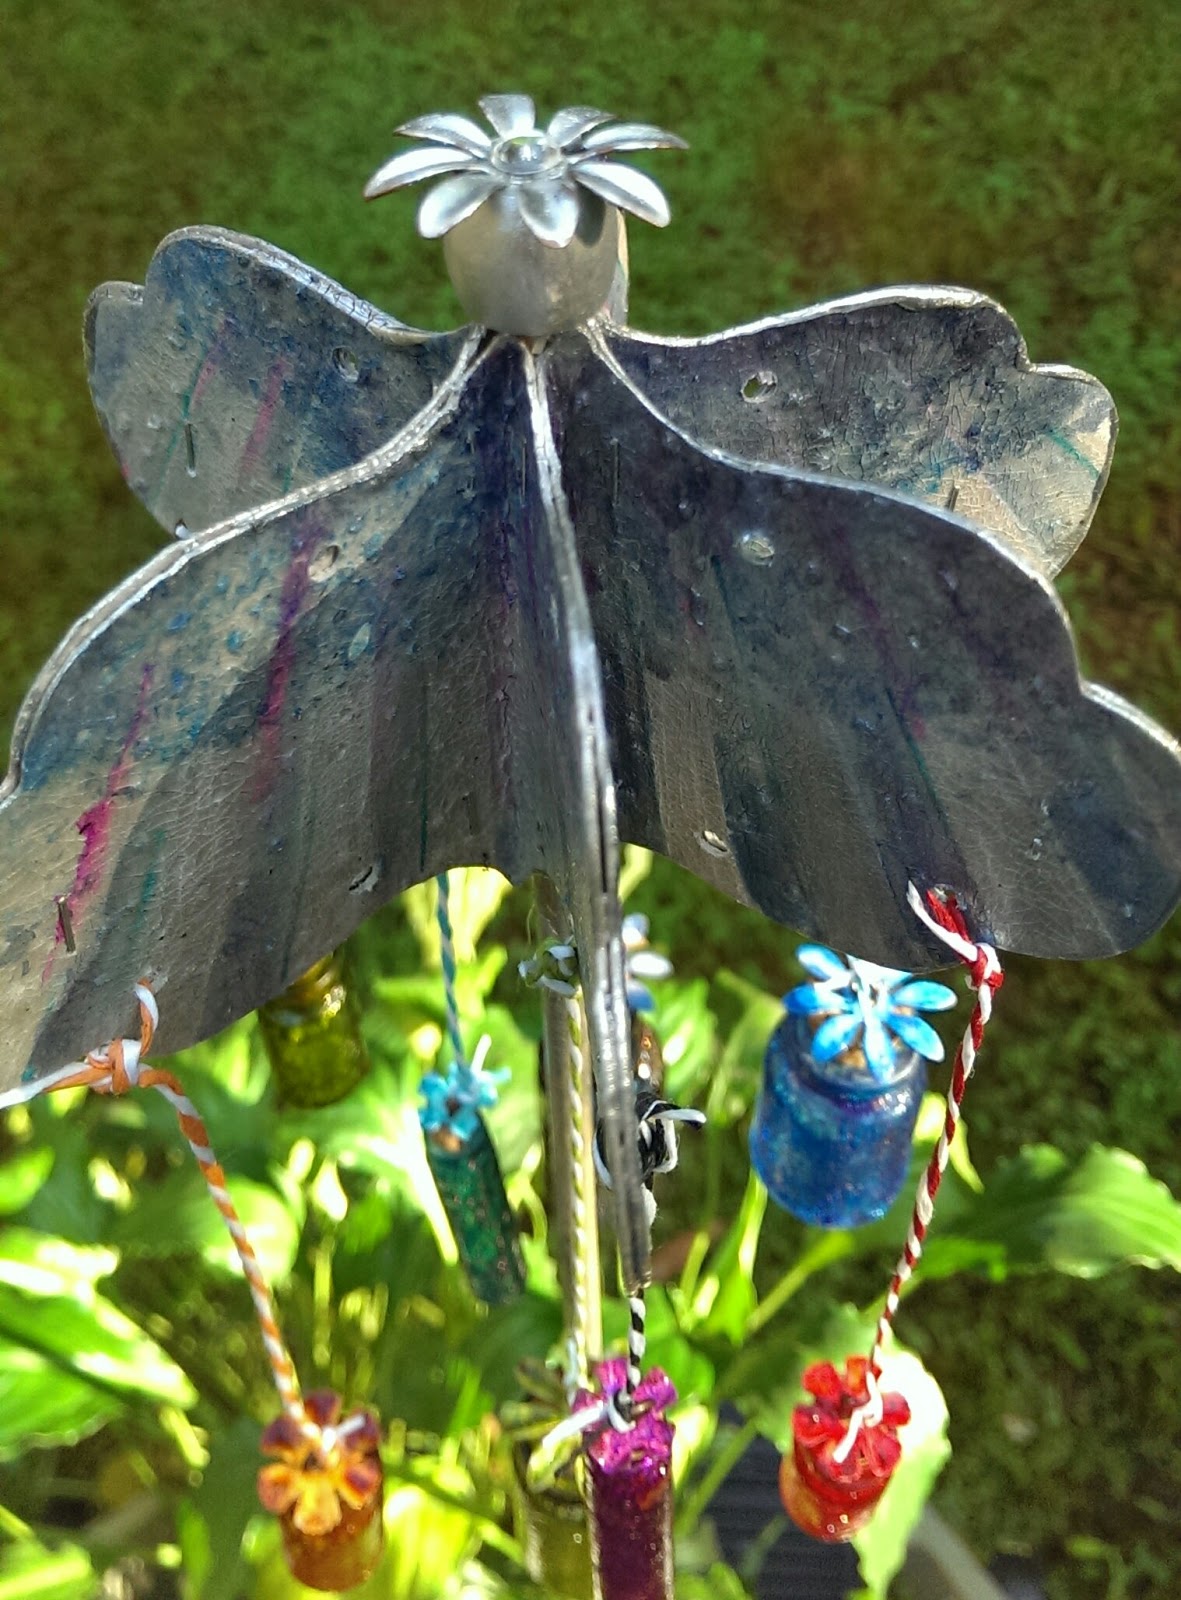
Suncatcher with Faux Cracked Glass CC3C 30


.

When I saw Linda's beautiful red hummingbird feeder she made  from a syrup bottle I knew I had to make a Sun Catcher for the Faux Cracked Glass challenge. You can see Linda's beautiful feeder at her blog. It is one of the wonderful art pieces you will find  at Linda Ledbetter's Compendium of Curiosities 3 Challenge #30.

I actually finished it over the weekend but being NOT a great photographer had a really hard time catching the light for a good shot.

thefunkiejunkie.com


The sponsor for this challenge is The Funkie Junkie Boutique. Yes, one lucky winner will win a $25 gift certificate to shop for goodies. I love to shop there so wish me luck!  There is also a prize for The Curiosity Crew's Choice. It is a box full of fantastic goodies donated by Tim Hotz and Mario Rossi. You still have time to join the fun. Create your own entry and link it up the challenge is open till this Friday. You can find a ton of inspiration from the Curiosity Crew here and the rules here.


These little bottles are Tim's Corked Vials. I colored them using Tim's Faux Cracked Glass technique from page 54 of his amazing book "A Compendium of Curiosities Volume III". If you don't have a copy you can order it directly from Tim and he'll sign it for you.  You can see I've used Tim's screw eyes twisted into the cork tops to add his paper twine for hanging.


The little flowers on top of the cork are Idea-ology foliage painted with Picket Fence Distress Paint, then alcohol ink and finally Rock Candy Distress Crackle. Make sure each layer is completely dry before going on to the next. I placed Tim's Screw Eyes through the holes and then twisted them  into the cork stoppers to attach the flowers. 


I made a hanger for my Sun Catcher vials out of Grunge paper that I die cut with Tim's Styled Labels die, painted with Distress Cracked Brushed Pewter Paint and embossed with his Rays embossing folder. Years ago Tim showed us how to make an Alcohol Ink Palette by dripping alcohol ink into a palette and letting it dry. The Alcohol Ink Refillable Pen has a brush nib and a fine point nib. Filled with blending solution it makes an excellent brush for picking up the alcohol ink and coloring glossy surfaces. The Brushed Pewter Cracked Distress Paint dries glossy so I was able to easily color my labels with alcohol inks. I folded the labels in half, glued and stapled them together with the mini attacher and inserted a dowel into the center making the top for my sun-catcher. I used my crop-a-dile to add holes to hang the corked vials from. I topped off the top with a white wooden bead I had in my stash and another foliage flower. I colored both with Silver mixative alcohol ink and put a clear gemstone in the center of the flower. It reminds me of a little pineapple and the silver color goes great with the pewter. To finish it off I painted the dowel with Brushed Pewter too.


Now I can stick the dowel into a potted plant and place it in front of the window in my craft room.

Friday, June 5, 2015

Eroded Metallic - Compedium of Curiosities 3 Challenge 29


On page 44 of "A Compendium of Curiosities Volume III" you will find the technique for the latest challenge from Linda Ledbetter and the Curiosity Crew.. Eroded Metallic is a gorgeous technique and the Curiosity Crew has created another amazing array of inspiring art.

The Sponsor for Challenge 29 is Inspiration Emporium,  They are generously giving away a $50 gift certificate to one lucky participant. Tim and Mario have also donated some prizes to be given to the Curiosity Crew's Choice. So 2 chances to win! Wish me Luck!!!

I decided to use this technique to alter a chipboard box I have had for quite some time. I actually finished the Eroded Metallic technique part last week. And I have been looking at it ever since. I just couldn't decide how I wanted to embellish it.

When I was a little girl, someone told me that when I saw a Cardinal it was a sign winter was here. It wasn't until recently I found out this wasn't true. I did a little research and found out they stay in the same territory all year long. When I won my Christmas Cardinal die (Thanks Linda and Crew) I knew I wanted to use them on something that wasn't obviously winter so they are the focal point and inspiration needed to finish my box.

Of course, I can't tell you how to do the Eroded Metallic technique. It is against the rules. But if you've enjoyed reading my tutorials in the past and would like to see a one on this project, just let me know. I'll make a separate tutorial page and post it in a few days. (without the Eroded Metallic technique of course).


Sunday, May 31, 2015

Last Day for Tim's May 12 Tags of 2015

I'm not the only one to wait to the last day to post my version of Tim's May 12 Tags of 2015. Many of the blogs I follow were posting their May tag yesterday and today too.

I don't have some of the products Tim used. Of course not having a particular product doesn't mean I can't make Tim's tag. I just have to be more creative. So instead of Burlap (which really looks fun to work with) I used his Burlap Texture fade and a Kraft tag. There were a few other things I don't have but they are on my wish list. So I decided to throw caution to the wind and get creative.

I used Abandoned Coral and Spun Sugar stain on the ribbon. The Chit Chat letters are colored with Distress Markers. The foliage is from Tim's Christmas Cardinal die. The musical notes are Remnant Rubs. The Singing bird, the 45¢ and the Crown savings stamps are from the Thrift Shop ephemera pack but the Nests and Eggs image is clipped from the 3x3 designs in the Wallflower Paper Stash. The eggs are colored with a Cracked Pistachio Distress Marker. I also used Idea-ology embellishments.

One thing I have been busy working on this week is my collection portfolio. I love Tim's Wallflower Paper Stash so that's what I'm using for my folio.  I am making lots of little pockets to add throughout the pages. I decided that once I made my May tag I could turn it into a pocket too.

After I finished my tag, I made an little bag out of Melange Tissue Wrap and glued the tag to the front with glossy accents.
The back of the bag is reinforced with a sheet of cream cardstock. The card is cut the same size as the bag. I used the flourish stencil and applied Walnut Stain distress ink with the mini blending tool. The cardstock was larger than the stencil so I turned the stencil sideways so I could apply the ink edge to edge.  One thing I quickly discovered was that the pattern repeated from side to side, overlapping by about a 1/4".  If you look closely at the small picture of the stencil you'll see the edge of the stencil under my thumb and that the area already inked is lining up with the stencil after I repositioned it further down the card.

I used the Mini Baroque Movers and Shapers die to cut a topper for the card. I cut it in half, inked it up and glued it to the top of the card then glued the card to the back of the bag.


You can check out Tim's tag here.

Wednesday, May 27, 2015

From Postbox Red Flowers to Wavy Hearts


First thing I want to share is how much I have enjoyed this month on the eP blog. I enjoy challenges, they bring out my crafty, creative side. Kim has given me the opportunity to work with some new products that I have not used before which made it a fun challenge. When I started thinking about my final project, I knew I wanted to make a scrapbook page about reading with my grandson, Jasper. If you want to see the tutorial, please hop on over to the eP blog.

When working on my projects each week, I tried to use mostly what Kim sent me along with things from my stash that she carries in her store. This was for two reasons. First, I know that when you show someone a new product and they like it they want to be able to find it. Second, Kim was very generous and sent me products to use for my guest designer posts. She also encouraged me to create anything I wanted and is she is super easy to work with. So of course, if you don't already shop here, I want to encourage you to check out  eclectic Paperie.

Thanks Kim for giving me a shot and if you ever want me to be a guest designer again just let me know. It's been fun.

Friday, May 22, 2015

CC3C 38 Alcohol Ink Ombre, Remembering the Moment


Here is my tag for Compendium of Curiosities 3 Challenge. If you are curious about Alcohol Ink and want to know more or even if you like working with them and just want some inspiration, you should check out this challenge. Linda Ledbetter and her Curiosity Crew create beautiful artwork for this bi-weekly challenge that promotes Tim Holtz's A Compendium of Curiosities Volume 3 and this week they all used the Alcohol Ink Ombre technique.

The background of my tag is created with Tim Holtz's Alcohol Ink on Gloss paper from Ranger. The technique is Alcohol Ink Ombre shown on page 57 of Tim's Volume 3 of A Compendium of Curiosities.

I've also used Wendy Veccki's Clearly for Art modeling film and Tim Holtz wood block Butterfly Stamp E1-1538 from Stampers Anonymous for the butterflies. I stamped the butterflies with Archival Jet Black ink on one side. On the other side of the film I used the Alcohol Ink Ombre technique. Then I cut out the butterflies and heated the modeling film with my heat tool and shaped it. Once it cools it holds the shape. You can heat it as many times as you need until you get the shape you want.

The other stamps I used are also from Stampers Anonymous, Urban Chic CMS086 and Mini Cirque CMS079.

Funkie Junkie Boutique is the sponsor of Challenge 28. I've shopped with Linda before and she has great selection and prices. Of course she has wonderful customer service too. There is also a chance to win a special prize (donated by Tim Holtz and Mario Rossi) awarded to the Curiosity Crew's Choice. Check out all the details at Linda's blog. This challenge ends tonight at midnight but a new one will start tomorrow.

I love the challenge and I love Tim's book. Of course I'm not the only one. There are quite a few talented artist that link their artwork to CC3C so If you are looking for inspiration you will find it just a click away.

Wednesday, May 20, 2015

Botanical Sketch CMS215 and Cracked Pistachio

http://eclecticpaperie.blogspot.com/2015/05/distress-paint-gelatos-glitter-paste.html

Hello everyone! Welcome to another Wednesday and my third post as guest designer at the eclectic Paperie blog.  This week I've used my favorite stamp, Tim Holtz Botanical Sketch CMS216 from Stampers Anonymous, along with Cracked Pistachio Distress Paint, Faber-Castell Gelatos, BoBunny Stickable Stencils and BoBunny Glitter Paste. Please be sure to visit the eP blog post to check out the tutorial at http://eclecticpaperie.blogspot.com/2015/05/distress-paint-gelatos-glitter-paste.html.

While you're there, please check out some of the other post at  eclectic Paperie's blog and also their shop.

Be sure to let me know what you think. Comments and questions are always welcome. Thanks for stopping by.

Wednesday, May 13, 2015

Fun Trophy Cup Photo Holder


For week number 2 as Guest Designer on the eclectic Paperie Blog I altered one of Tim Holtz Idea-ology Trophy Cups to create a photo holder for these fun little Fuji Film Instax Mini photos! It was fun and easy to make. Hop on over the eclectic Paperie blog to see the tutorial and be sure to leave a comment! Thanks for stopping by.
Related Posts Plugin for WordPress, Blogger...