Tuesday, June 30, 2015

June 12 Tags of 2015 - Coffee!

So What's Your Favorite Brand of Coffee?


I grew up with the "Good To The Last Drop!" coffee in my house. It's still my favorite. However Tim, Mario and my coffee drinking daughter Sarah are fans of another brand. If you are a Tim fan you know which one it is.

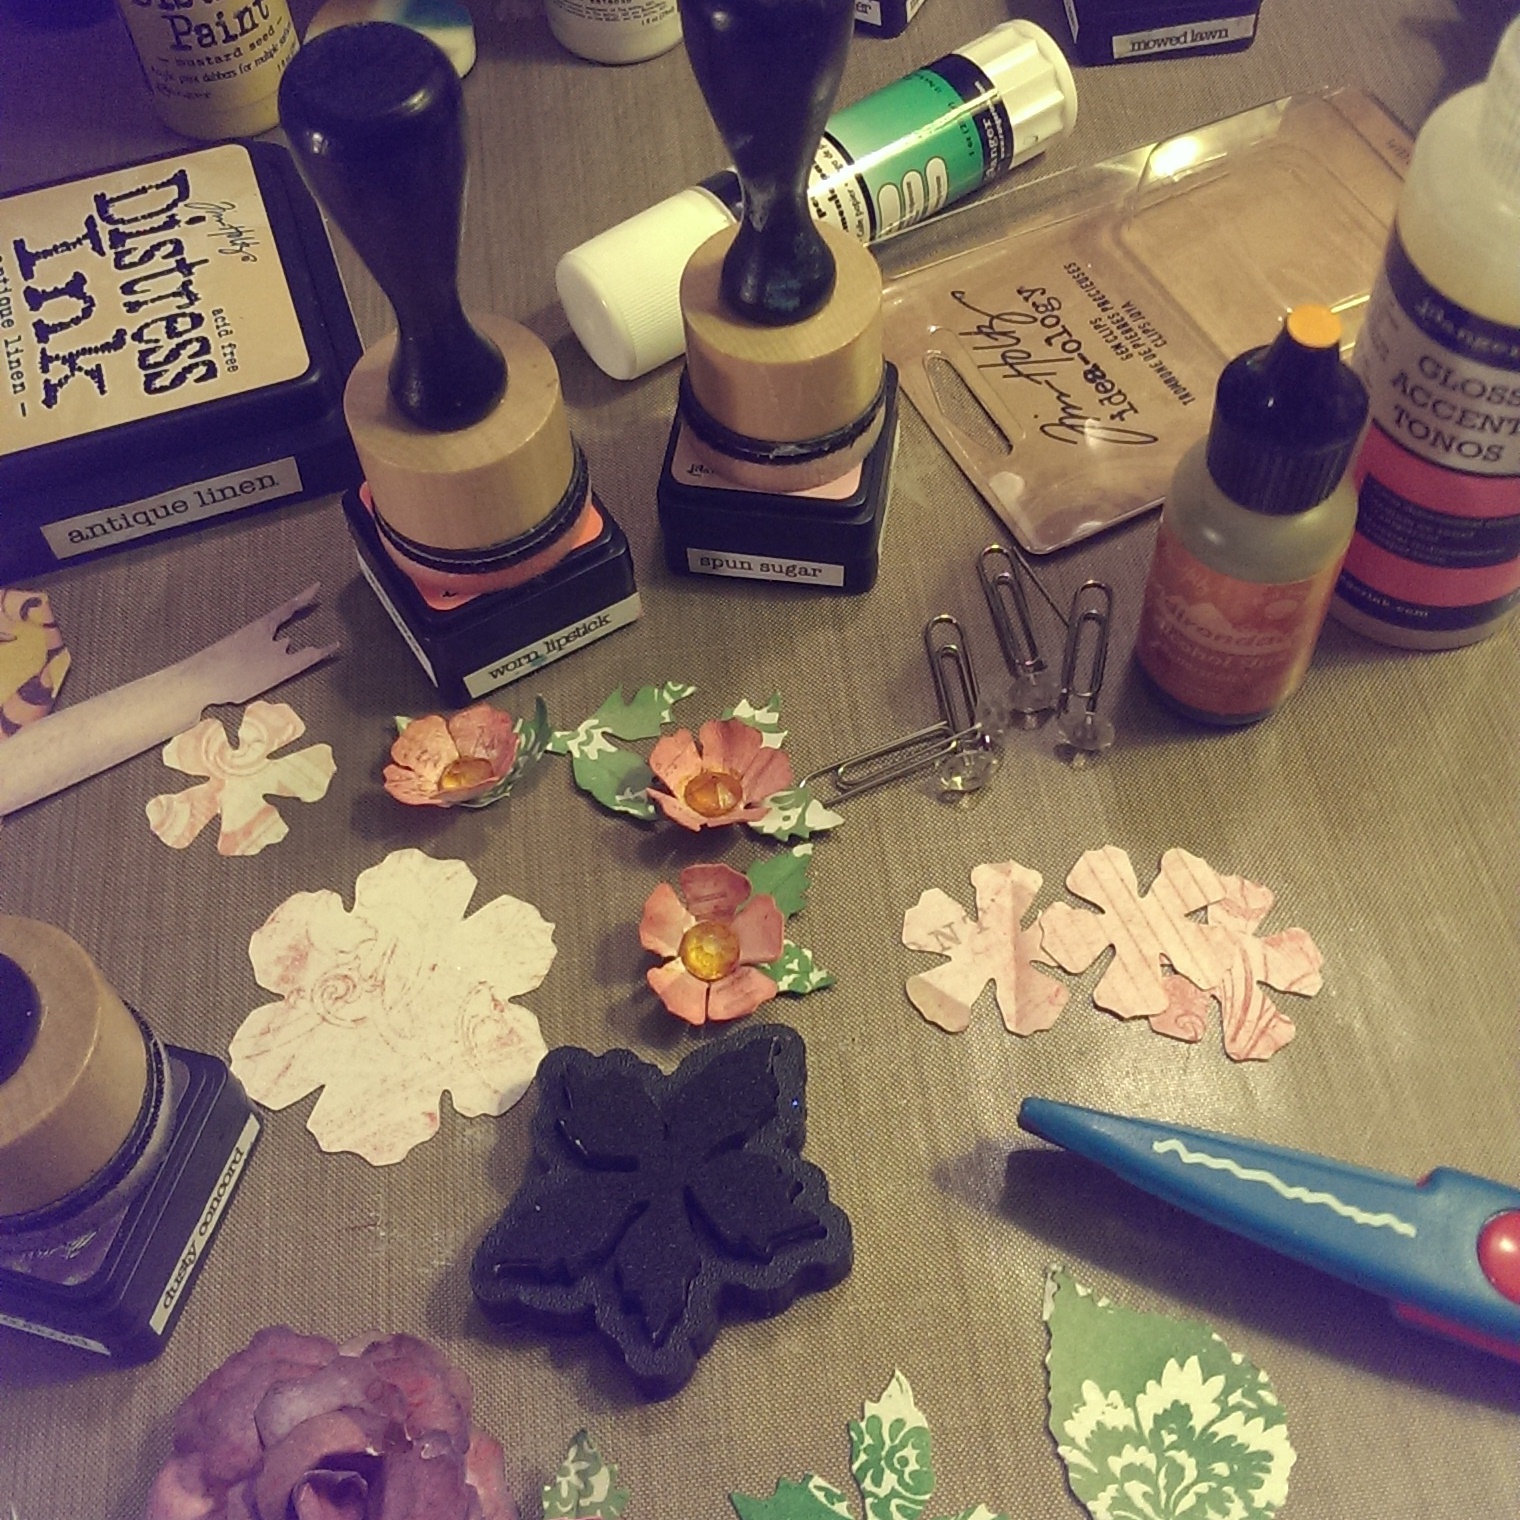
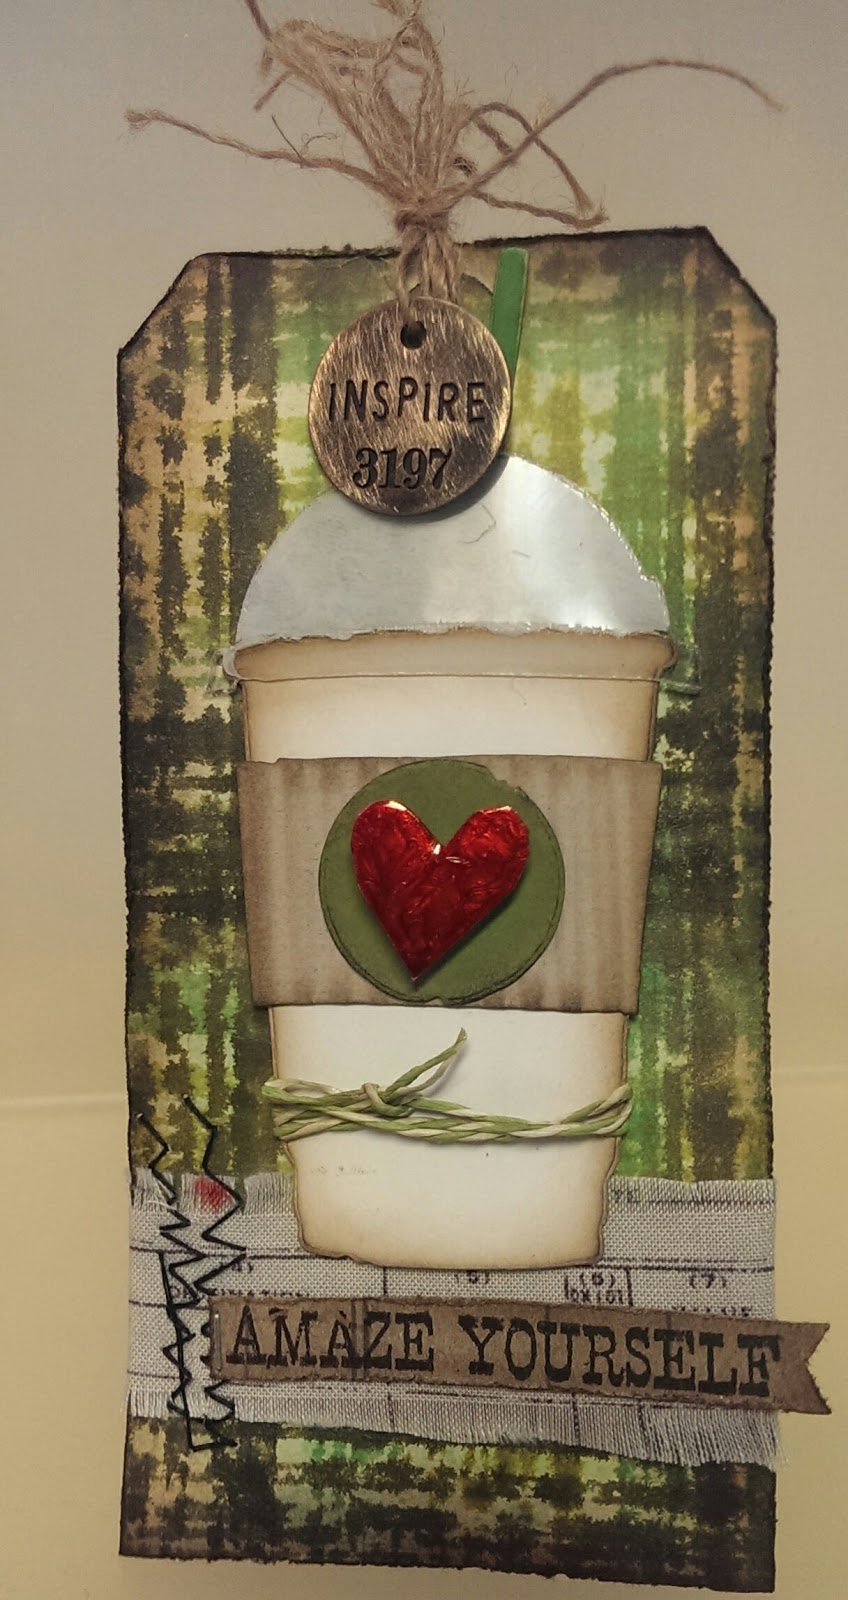
When I saw Tim's tag this month I knew I had to make it. I really lucked out this time too. I don't have the coffee die but Linda at The Funkie Junkie Boutique encloses little goodie bags in her orders. I always find fun little surprises in these gift bags. I remember that she had enclosed a set of the coffee diecuts in the goodie bag with my last order. (Thanks Linda!) It was before Tim posted the June tag so it was just turned out lucky for me that I hadn't used them yet. The pieces Linda sent me were white except for  the corrugated band and the acetate top. I think the white cup turned out great on my tag.

I Love Distress Minis!
I followed most of Tim's directions with a few changes here and there due to what supplies I had on hand. I was so excited when I saw Tim's plaid. I was able to recreate my plaid using Distress Minis with his Stripes Layering Stencil. The first tag I did was with Festive Berries, Weathered Wood and Faded Jeans. I loved the way it looked but quickly realized that I had skipped Tim's first step.

When I realized what I did (or didn't do) I decided to start over. One reason was because the technique was so quick and easy. Another  was that I really need to play more with my Distress Sprays and finally I decided to use shades of greens. I'll use my Red, White and Blue tag for a July project.
Can you see the shimmer?

I spritzed my tag with water then Cracked Pistachio Distress Stain. I decided I wanted a little shimmer so I used Perfect Pearls Mists in heirloom gold instead of plain water for the drips and splatters step that was next. The colors of Distress Minis I used for my plaid were Forest Moss, Mowed Lawn and Crushed Olive.

I wanted a heart where Tim used a star. I freehand cut one out of Clearly for Art Modeling film by Wendy Vecchi. I painted it with Brushed Pewter Distress Crackle Paint and when it was dry added drops of Watermelon Alcohol ink.

I still don't have any of Tim's burlap so I used fabric from Tim's Eclectic Elements Line. The phrase I used is from Tim's stamp set Way With Words CMS165 from Stamper's Anonymous.

I always find such wonderful inspiration and tutorials at Tim's blog. If you want to see Tim's June tag and check out his great tutorial click here. Another place to get ideas for using Tim's products is the Ranger Ink blog. If you'd like to see some fun projects the Ranger Artists created after being inspired by Tim's June tag click here.

Tuesday, June 23, 2015

Layering Stencil Fun for the Compendium of Curiosities 3 Challenge

I had such fun working on my entry for Challenge #31 at Linda Ledbetter's Compendium of Curiosity 3 Challenge. Layering Stencil: Paint Resist that I posted a couple of photos of my work in progress shots on Instagram. Did you see them? Here is the completed tag.


The background of my tag was created using the technique from page 47 of Tim Holtz's "A Compendium of Curiosities Volume III". I used Picket Fence and Mustard Seed Distress Paint and Spun Sugar, Worn Lipstick, Dusty Concord and Squeezed Lemonade Distress Ink along with the Harlequin and Flourish Stencil but as to how I did it you will need to check your own copy of the book. 
Rules for the challenge are here and loads of inspiration for the technique is here.
Sponsor of this challenge is Inspiration Emporium.  They are generously donated a $50 gift certificate that some lucky winner can use to purchase some more goodies. If you want to check them out click here.

I realized I needed more of the smaller flowers.
Alcohol Ink on Gems

After finishing my base tag, I decided to create some flowers using one of my favorite dies, Tattered Florals. I used the pink pattern paper from Tim's Vintage Shabby Paper Stash.  For the smaller flowers I used the smallest flower on the Tattered Florals die and after inking it up and shaped the petals with my fingers. For the centers I took the gems off the ends of Tim's Idea-ology "Gem Clips" and colored them with Butterscotch Alcohol ink then glue them into the center with Glossy Accents.

Making leaves and flowers
The leaves for the smaller flowers are die cut from the Motif paper stash which includes both white and kraft colored paper with varnished designs that resist ink. I inked the paper up with Bundle Sage and Mowed Lawn Distress Inks, then die cut them with the small Poinsettia mover and shaper die. I cut each poinsettia into sections with 2 petals for each flower. For the larger leaf, I hand cut a leaf shape using my very old deckle edged scissors. (I started scrapbooking when these were cutting edge technology!) I glued the leaves to the flowers. Once everything was dry I started playing around and arranging the flowers.

I used the Tattered Floral Die for the large rose. I used Dusty Concord Distress Ink and a blending tool over the Vintage Shabby die cuts. I won't go into all the details here but here is a link to a really good turorial by Hels Sheridan, one of the Curiosity Crew members, for a large rose.  It's not exactly how I made mine but really close.

I used the Tattered Banners die and Remnant Rubs to create my banners, and finished up my tag by adding a few Idea-logy embellishments colored with alcohol inks and of course a ribbon bow.

My Layering Stencil: Paint Resist tag before I started putting everything together.

Monday, June 15, 2015

Suncatcher with Faux Cracked Glass CC3C 30


.

When I saw Linda's beautiful red hummingbird feeder she made  from a syrup bottle I knew I had to make a Sun Catcher for the Faux Cracked Glass challenge. You can see Linda's beautiful feeder at her blog. It is one of the wonderful art pieces you will find  at Linda Ledbetter's Compendium of Curiosities 3 Challenge #30.

I actually finished it over the weekend but being NOT a great photographer had a really hard time catching the light for a good shot.

thefunkiejunkie.com


The sponsor for this challenge is The Funkie Junkie Boutique. Yes, one lucky winner will win a $25 gift certificate to shop for goodies. I love to shop there so wish me luck!  There is also a prize for The Curiosity Crew's Choice. It is a box full of fantastic goodies donated by Tim Hotz and Mario Rossi. You still have time to join the fun. Create your own entry and link it up the challenge is open till this Friday. You can find a ton of inspiration from the Curiosity Crew here and the rules here.


These little bottles are Tim's Corked Vials. I colored them using Tim's Faux Cracked Glass technique from page 54 of his amazing book "A Compendium of Curiosities Volume III". If you don't have a copy you can order it directly from Tim and he'll sign it for you.  You can see I've used Tim's screw eyes twisted into the cork tops to add his paper twine for hanging.


The little flowers on top of the cork are Idea-ology foliage painted with Picket Fence Distress Paint, then alcohol ink and finally Rock Candy Distress Crackle. Make sure each layer is completely dry before going on to the next. I placed Tim's Screw Eyes through the holes and then twisted them  into the cork stoppers to attach the flowers. 


I made a hanger for my Sun Catcher vials out of Grunge paper that I die cut with Tim's Styled Labels die, painted with Distress Cracked Brushed Pewter Paint and embossed with his Rays embossing folder. Years ago Tim showed us how to make an Alcohol Ink Palette by dripping alcohol ink into a palette and letting it dry. The Alcohol Ink Refillable Pen has a brush nib and a fine point nib. Filled with blending solution it makes an excellent brush for picking up the alcohol ink and coloring glossy surfaces. The Brushed Pewter Cracked Distress Paint dries glossy so I was able to easily color my labels with alcohol inks. I folded the labels in half, glued and stapled them together with the mini attacher and inserted a dowel into the center making the top for my sun-catcher. I used my crop-a-dile to add holes to hang the corked vials from. I topped off the top with a white wooden bead I had in my stash and another foliage flower. I colored both with Silver mixative alcohol ink and put a clear gemstone in the center of the flower. It reminds me of a little pineapple and the silver color goes great with the pewter. To finish it off I painted the dowel with Brushed Pewter too.


Now I can stick the dowel into a potted plant and place it in front of the window in my craft room.

Friday, June 5, 2015

Eroded Metallic - Compedium of Curiosities 3 Challenge 29


On page 44 of "A Compendium of Curiosities Volume III" you will find the technique for the latest challenge from Linda Ledbetter and the Curiosity Crew.. Eroded Metallic is a gorgeous technique and the Curiosity Crew has created another amazing array of inspiring art.

The Sponsor for Challenge 29 is Inspiration Emporium,  They are generously giving away a $50 gift certificate to one lucky participant. Tim and Mario have also donated some prizes to be given to the Curiosity Crew's Choice. So 2 chances to win! Wish me Luck!!!

I decided to use this technique to alter a chipboard box I have had for quite some time. I actually finished the Eroded Metallic technique part last week. And I have been looking at it ever since. I just couldn't decide how I wanted to embellish it.

When I was a little girl, someone told me that when I saw a Cardinal it was a sign winter was here. It wasn't until recently I found out this wasn't true. I did a little research and found out they stay in the same territory all year long. When I won my Christmas Cardinal die (Thanks Linda and Crew) I knew I wanted to use them on something that wasn't obviously winter so they are the focal point and inspiration needed to finish my box.

Of course, I can't tell you how to do the Eroded Metallic technique. It is against the rules. But if you've enjoyed reading my tutorials in the past and would like to see a one on this project, just let me know. I'll make a separate tutorial page and post it in a few days. (without the Eroded Metallic technique of course).


Related Posts Plugin for WordPress, Blogger...