Showing posts with label Funkie Junkie. Show all posts

Tuesday, June 30, 2015

June 12 Tags of 2015 - Coffee!

So What's Your Favorite Brand of Coffee?
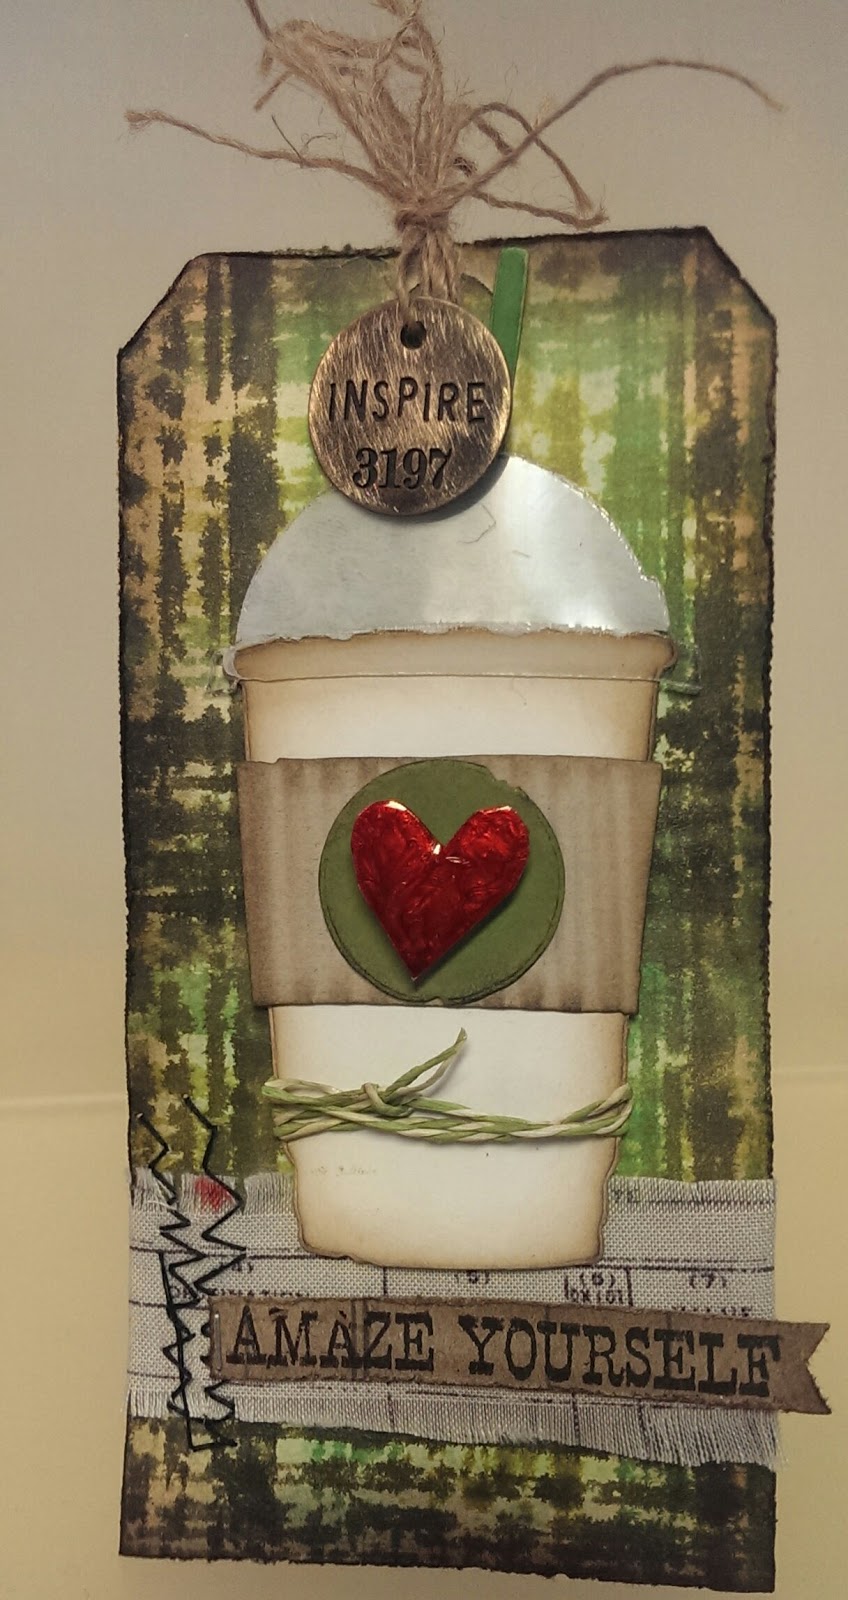

I grew up with the "Good To The Last Drop!" coffee in my house. It's still my favorite. However Tim, Mario and my coffee drinking daughter Sarah are fans of another brand. If you are a Tim fan you know which one it is.

When I saw Tim's tag this month I knew I had to make it. I really lucked out this time too. I don't have the coffee die but Linda at The Funkie Junkie Boutique encloses little goodie bags in her orders. I always find fun little surprises in these gift bags. I remember that she had enclosed a set of the coffee diecuts in the goodie bag with my last order. (Thanks Linda!) It was before Tim posted the June tag so it was just turned out lucky for me that I hadn't used them yet. The pieces Linda sent me were white except for  the corrugated band and the acetate top. I think the white cup turned out great on my tag.

I Love Distress Minis!
I followed most of Tim's directions with a few changes here and there due to what supplies I had on hand. I was so excited when I saw Tim's plaid. I was able to recreate my plaid using Distress Minis with his Stripes Layering Stencil. The first tag I did was with Festive Berries, Weathered Wood and Faded Jeans. I loved the way it looked but quickly realized that I had skipped Tim's first step.

When I realized what I did (or didn't do) I decided to start over. One reason was because the technique was so quick and easy. Another  was that I really need to play more with my Distress Sprays and finally I decided to use shades of greens. I'll use my Red, White and Blue tag for a July project.
Can you see the shimmer?

I spritzed my tag with water then Cracked Pistachio Distress Stain. I decided I wanted a little shimmer so I used Perfect Pearls Mists in heirloom gold instead of plain water for the drips and splatters step that was next. The colors of Distress Minis I used for my plaid were Forest Moss, Mowed Lawn and Crushed Olive.

I wanted a heart where Tim used a star. I freehand cut one out of Clearly for Art Modeling film by Wendy Vecchi. I painted it with Brushed Pewter Distress Crackle Paint and when it was dry added drops of Watermelon Alcohol ink.

I still don't have any of Tim's burlap so I used fabric from Tim's Eclectic Elements Line. The phrase I used is from Tim's stamp set Way With Words CMS165 from Stamper's Anonymous.

I always find such wonderful inspiration and tutorials at Tim's blog. If you want to see Tim's June tag and check out his great tutorial click here. Another place to get ideas for using Tim's products is the Ranger Ink blog. If you'd like to see some fun projects the Ranger Artists created after being inspired by Tim's June tag click here.

Thursday, July 10, 2014

Altered Canvas Panel ~ First Time for Everything

If you have ever picked up one of Tim Holtz's Canvas Panels and thought "What would I do with this?" this challenge is for you. I don't know how many times I have thought about buying one and making it my own but this is the first time I actually bought one and brought it home. "Why now?" you may ask, well Linda Ledbetter's Compendium of Curiosity 3 Challenge 6 is to go to page 37 of Tim's book "A Compendium of Curiosities III" and play along. If you want more inspiration and ideas for your own panel, check out the Curiosity Crew's fantastic panels here. They have created 9 totally different and amazing canvases including a mini Christmas album.

The sponsor for Challenge 6 is the Funkie Junkie Boutique. There is also a prize from Tim and Mario. Check out the details and rules here.

3 Dimensional Butterfly
While I can't share the technique from the book on my blog (You need to work from your
own copy to participate in the challenge) I can tell you a little bit about how I created my 3D butterfly. I started by heat embossing Scattered Straw and Tea Dye Distress Embossing Powder onto a brass butterfly that was in a little gift goodie bag I got in a recent order from the Funkie Junkie Boutique. Tim's Melange Tissue Wrap has a large butterfly. I wanted to make it the focal point of my piece so I glued it to a piece of Wendy Vecchi's Clearly For Art Modeling Film and cut it out. After heating it with a heat tool, this film can be shaped any way you want, so I molded it to fit the shape of the brass butterfly. I used Distress Paint then a Distress Marker with the Marker Spritzer to tint the tissue butterfly and glued the pieces together with Sepia Accents by Ranger, giving it a stained glass look.

If you are looking for a copy of Tim's book, you can order one directly from him and he will Autograph it for you. Here's the link.

WOW!


P.S. I recently won a $25 gift certificate from Linda at The Funkie Junkie Boutique. I was surprised how much I was able to purchase and was so excited when my order arrived. It was my first time ordering from her. She has excellent prices plus fantastic and speedy service. The brass butterfly I used here was part of a little goodie bag she included with my order. Thanks Linda!

Related Posts Plugin for WordPress, Blogger...