Showing posts with label Faber-Castell Gelatos. Show all posts

Tuesday, July 14, 2015

Mostly Green Gelatos, A Challenge

I just finished my second 2 boards for my Gelatos Art Journal. I was inspired by Mou Saha's July "Take the Challenge With Mou". Her challenge for July was to use mainly Green. I decided to create a page centered around leaves. I love the beauty of nature. There is something peaceful for me to just sit in a shady spot, watch the wind blow through the leaves and hear the birds sing. I wanted to capture a little of that peace in my journal.

 
To prepare my boards, I applied gesso through a 101 Stencil with a palette knife on the left page, applying the gesso heaviest on the left side of the page. Then I flipped the stencil over  and pressed it onto the board on the right to transfer the excess gesso. I wanted to play with the gelatos and see how they worked with the resist of the gesso compared to the surface of the plain board.


After allowing the gesso to dry I scribbled on my boards with my gelatos, using mainly green with a little yellow. I wanted the color to run diagonally across the boards. Using my finger to blend I only had to lightly mist with a little water to get the look I wanted. I worked on both boards at the same time, treating them as one page. I was able to wipe more color off the gesso areas using a baby wipe,  making sure I kept switching to a clean area of the wipe as I worked.  I could also let the color build up on the baby wipe and and use it blend the color in the areas not covered with gesso by using a lighter touch. I was careful not to over-work the board while it was wet to keep from damaging the surface. You can also use a heat tool to dry your board or set it aside and let it air dry.


I used a Sizzix Originals die that had 3 leaves on a branch to cut out a bunch of leaves from some patterned paper from my stash.
Since I used a heavy weight paper (probably Basic Grey) I was also able to use it as a guide to draw with my Silver Paper Crafter's Crayon, adding silvery leaves onto my background. I buffed the silver leaves with a dry paper towel to get a soft shine.


I scribbled with a Chocolate gelato on the branches. I lightly misting them with water and blended the color a little with my fingers, letting some of the texture of the pattern show through. I then sketched in the lines on my leaves with a Light Green Big Brush Pen.


Once I glued the leaves to the board I used  the May Green and Green Olive Big Brush Pens to add more detail to the leaves.


I found a quote by Albert Schweitzer I thought would be perfect for my art journal. "Never say there is nothing beautiful in the world anymore. There is always something to make you wonder in the shape of a tree, the trembling of a leaf." I printed it onto white cardstock, cut it into strips, glued it down and sealed it with gel medium.


I scribbled some gelatoes into the wells of a palette, sprayed them with a little mist of water and mixed them up to make some water colors. I used a water brush to add more of the colors to the leaves, branches and edges of the word strips.

Shine on the green leaves is glaze, The silver leaves are buffed silver crayon.
Once everything was dry I used a small flat (dry) paintbrush to add glaze medium to the leaves. I love the shimmer of the glaze on the leaves. Just enough shine to highlight and enhance the color but not as glossy or dimensional as glossy accents would be. The added shimmer of the silver crayon is subtle and looks like shadowy background leaves, adding another layer of depth.

Every month Mou Saha has a challenge on the Faber Castell Design Memory Craft Blog. I hope you hop over to  Take the Challenge with Mou and see her beautiful page. You still have time to enter. Usually the challenge runs for 2 weeks but this months challenge is running a little longer so you have until Sunday, July 26 to enter.

If you want to see Mou's other works her blog is http://collagecollagecollage.blogspot.com/


Sunday, July 5, 2015

Gelatos and Art Journaling

An art journal is a great way to play with different products and techniques. I had a Faber-Castell mini board journal I had won in their February "Take The Challenge With Mou" monthly challenge, so I decided to start an art journal for my gelatos.


Since Summer Sun and Sunny Flowers were the inspiration for my first pages of my art journal, I decided to enter my pages into The Mixed Media Monthly Challenge # 14 - Summer Days, which runs through July 31st.


Along with my gelatos, I used quite a few different techniques and products, almost all are part of the Faber-Castell Design Memory Craft line. I started by covering the entire surface of two of the art boards with gesso. Once it was dry I used a stencil from their 101 collection that had dots that went from small to a medium size and applied some gel medium with a spatula. The gel medium added texture and worked as a resist. Then I set my boards aside to let it dry.

A quick word about the Faber-Castell stencils. You can purchase sets of stencils or they may come in one of their kits. They are made of chipboard so do not hold up well if saturated with water but the gel medium and paste worked fine with them. I decided to use a spray sealer on my stencils and that seems to be working fine for me.

Applying the gesso to the boards allowed the gelatos to blend easily and be lightened or removed entirely with baby wipes. I picked some yellow, pink and orange gelatos and scribbled color on the boards and then blended with my fingers. You can also moisten your fingers with a little water to help blend the colors.

I used a small dot stencil from the Mixed Media With Gelatos kit and baby wipes to remove some color across the top of the right board and lower left corner of the left board. The other dots are from the gel resist. I used the flower stencil from the same kit still working with the yellows and oranges applied the gelatos with my finger tips to blend, then added some details with Stampers Big Brush Pens. I used a Faber-Castell papercrafters silver crayon to fill in circle in the center of the flower.

Once I had my flowers the colors I wanted I added some Glass Bead Glitter Gel through the stencil. I had to let it dry before adding it to the 3rd flower. In the picture you can see the gel is white and opaque when applied. It dries clear and glittery and very textured from the beads.

Glass Bead Glitter Gel dries clear.
Then I inked up a flourish stamp with Stampers Big Brush Pens and stamped to add some more texture to the page. I put my pages aside for a few days while I worked on some other projects. When I came back to my art journal I was having so much fun I forgot to take pictures but here is how I finished up.

First I decided my flowers needed stalks so I quickly drew them in with Light Green and Green Olive Stampers Big Brush Pens. Then I mixed some gelatos with whipped spackle and applied it to the left page with a spatula to add more texture and deeper colors.

Next I used my yellow gelatos on some Tim Holtz water color paper. I also used the dropper tool to add some drips of Metallic Melon Gelato mixed with water to the water color paper and across the tops the journal pages. I hand stamped my quote inking up my alphabet stamps with a black Stamper's Big Brush Pen. I tore the paper from around the quote and used a glue stick to glue it to the left page. The white edges looked a little too bright so I added some water to the yellow gelato on my kraft sheet and applied the watercolor to the torn areas with a brush. For the final touch I added some white gelatos to the flower petals inbetween the stenciling and then once dry applied the Yellow Stampers Big Brush Pen. This brighten the flowers up a little and mdke them a little sunnier.

For the month of June the folks over at Faber-Castell Design Memory Craft had a Art Journaling Month where they had 5 members of their design team post tutorials each week showing how they created their art journals. By the end of June I had seen quite a few fun ideas for using my Gelatos. If you are looking for ideas on how to use their products their blog a great place to start. You can see Mou Saha's completed journal on her blog here.

Friday, July 3, 2015

30 Days of Coloring Inspiration

 The Daily Marker 30 Day Coloring Challenge 2 Started June 1st. Each day Kathy Racoosin posted a Card, Coloring Technique, Video or Give Away along with a daily challenge for everyone to enjoy coloring for 10 minutes. Her blog is The Daily Marker

Here are just a few of the projects I completed this month while enjoying Kathy's challenge.

Distress Paint, Distress Inks, Embossing and Distress Markers and Glitter Paste with Wildflower Stencil
During the month of June I would visit Kathy's blog. There was always something new. Some days she posted a card or a technique filled video and some days she would have a give away. I started strong with the goal of coloring something everyday. I posted my work on Instagram with her hashtag #thedailymarker30day2.

Distress Markers, Perfect Pearls Mist Forever Blue and White Embossing Powder


Gelatos and White Embossing Powder
 I did color something most days and made several cards.

 Collection Portfolio Cover using techniques from "A Compendium of Curiosities" by Tim Holtz

I also worked on my Collection Folio using some of my favorite techniques from my copy of Tim Holtz's first book "A Compendium Of Curiosites".

Prismacolor Color Pencils
 
I also colored in my copy of "Enchanted Forest" by Johanna Basford. 

Comparing Distress Markers, Prismacolor Pencils and Gelatos with Winnie and Walter Stamp
One day Kathy posted a Copic marker color combo comparison chart. Since I don't used Copics, I decided to make a little chart comparing my favorite coloring mediums.

Even when Kathy is using her Copics I learn a lot from her about color combinations, shading and lighting, blending, design and composition. Kathy makes beautiful cards.

 It has been a fun month for me as far as coloring goes. Well actually June has just been an all around fun month. Not only have I been able to spend a lot of time coloring, I have been able to spend time with family, some of which I haven't seen in a while, celebrated my sister's birthday with her and visited with old friends.

http://www.thedailymarker.com/2015/06/day-1-copic-coloring-and-video/

 If you like to color stamped images and especially if you are wondering about Copic markers or water coloring techniques be sure to check out Kathy's blog The Daily Marker. And here is a link to her compilation of the challenge with the cards she created each day along with links to each post http://www.thedailymarker.com/2015/07/wrap-up/. While you're there be sure to look around. Kathy is always posting something beautiful on her blog. After all she loves to color and she is very good at it.

Wednesday, May 20, 2015

Botanical Sketch CMS215 and Cracked Pistachio

http://eclecticpaperie.blogspot.com/2015/05/distress-paint-gelatos-glitter-paste.html

Hello everyone! Welcome to another Wednesday and my third post as guest designer at the eclectic Paperie blog.  This week I've used my favorite stamp, Tim Holtz Botanical Sketch CMS216 from Stampers Anonymous, along with Cracked Pistachio Distress Paint, Faber-Castell Gelatos, BoBunny Stickable Stencils and BoBunny Glitter Paste. Please be sure to visit the eP blog post to check out the tutorial at http://eclecticpaperie.blogspot.com/2015/05/distress-paint-gelatos-glitter-paste.html.

While you're there, please check out some of the other post at  eclectic Paperie's blog and also their shop.

Be sure to let me know what you think. Comments and questions are always welcome. Thanks for stopping by.

Friday, February 13, 2015

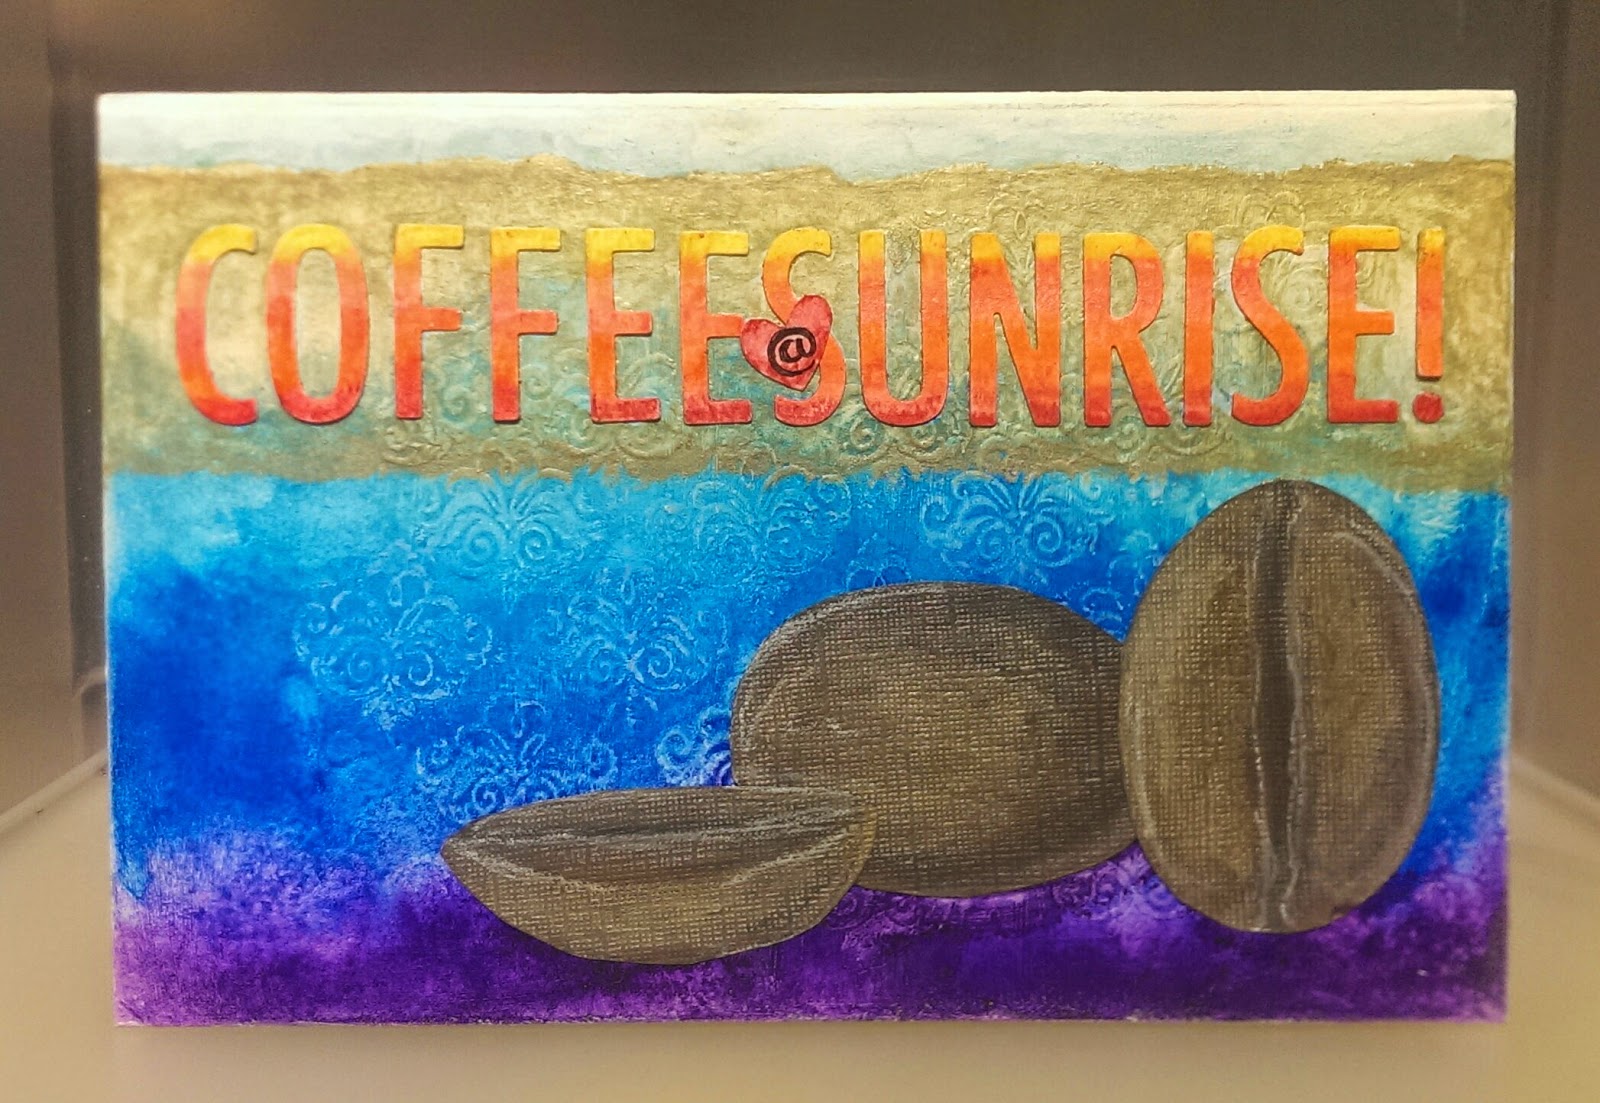
Coffee Time!

I love coffee in the morning. Imagine a perfect day starting with a fresh brewed cup of coffee, on a quiet and peaceful balcony somewhere overlooking a gorgeous view and watching at a beautiful sunrise. At least that's what I was thinking of when reading about Mou Saha's Faber-Castell project challenge.


Mou Saha is a wonderful mixed media artist and she has an excellent blog, http://collagecollagecollage.blogspot.com/. She also has a monthly challenge at Faber-Castell Design Memory Craft. The theme for this month is to create a project about your favorite beverage. I had a box that is the perfect size for my gelatos that I wanted to decorate so I decided to give it a try. You can find Mou's February challenge here.

I used gesso to prep the lid to the box. I used a little flourish stamp that came with a set of blue Faber-Castell Gelatos to heat emboss a repeating pattern across the surface and then gessoed over it again. This gave me a texture to allow the gelatos to pool. I used Coconut, various blues and purple to create an ombre. Once it was completely dry, lightly applying coconut over the raised areas helped to define the flourishes. Using Gold Champagne, Squid and Coconut, I sketched three large coffee beans on dark brown distress core'dinations paper then cut them out and glued them down.  Love the coverage, shimmer and shine. I used another ombre of Bannana, Bubble Gum, Metallic Mellon, Tangerine, Blood and Red Cherry for the letters. Then finished my project with a Gold Champagne banner behind the Coffee @ Sunrise banner.

This challenge ends today but Mou has a new one the first Monday of each month. If you have any Faber-Castell products, these are both great blogs to find fun, creative and inspiring ways to use them

Sunday, August 10, 2014

Shake it up, Baby!

ETA? Just added to the "Clicking Cameras" Challenge
Recently I've seen some really cute shaker cards on some of the blogs I visit. Shaker cards are all the rage right now, so when I opened my mail Friday I decided I should make one. What's so special about opening mail on Friday and how does that relate to shaker cards? Friday I received my first set of Winnie and Walter stamp sets in the mail. Jennifer McGuire had a guest post at Winnie and Walter and was giving away a gift certificate for Winnie and Walter to 3 lucky people who left a comment on her blog. I loved the card she made and what she had to say about Winnie and Walter so I checked out their blog. I loved them too! So I left a comment on Jennifer's blog and I was one of the winners!

I was actually able to order 2 stamp sets with my gift certificate, so I chose "V is for cheVron" from their new July release and a set called "The Write Stuff - Picture Perfect." I loved all of the cards made with the "V is for cheVron" stamp set on the Winnie and Walter blog so my first choice was easy. My second choice was a little harder because I loved the vellum card Jennifer McGuire made with "The Big, the Bold and Extras", but my daughter has recently purchased a Fuji instax mini 8 camera so when I saw the "The Write Stuff - Picture Perfect" stamp set with its adorable little camera and all the cute little sayings and icons, I had to have it.

fun surprise in my package
When my stamps arrived, they were tied up with a pretty little baker's twine bow along with a sweet little hand stamped tag thanking me for my order and a cute little glassine envelope sealed with washi tape and filled with little mini sequins. I had so much fun shaking it up I decided I must make a shaker card.

Winnie and Walter also have cut files to coordinate with their stamp sets. They include both svg and png files, so I had to have those too.  I was able to import the svg file to my Sizzix Eclips Sure Cuts A Lot software and cut out the pieces for my shaker camera.

mini sequins and micro beads
I recently purchased some Faber-Castell Gelatos while taking "Watercolor for Card Makers" by Online Card Classes. I'm still experimenting with the Gelatos and decided to use them for this card. They are not as easy for me to work with when stamping as the Distress Inks and Markers that I love, but every now and then I need to step outside of my comfort zone and try something new. I stamped the camera on the camera cut out with Archival Jet Black ink and then used the gelatos to water colored it.

I arranged all of  the little icon stamp images on my Fiskars Easy Stamp Press to stamp a background. It was easy to use the grid on the Stamp Press to evenly space the icons to make a pattern. I then colored the stamps with the gelatos and misted them, then stamped. I  colored the stamps and misted a second time to fill my 5" x 4 3/4" panel. Then once it was dry I added some swatches of color by scribbling the gelatos on a acrylic block and using a water brush to pick up some color and add it to the background.

you + me text fit perfectly inside V for chevron
I used 2 of the V's from "V is for cheVron" to create the banner behind the camera and cut it out by hand. I love the way the little saying from The Write Stuff  set (you + me) fit inside the V outline. The twine was from my packaging.

I wanted to share two links to some really cute shaker cards.  The first one is from the Simon Says Stamp blog that has a cute little lunch box note shaker card made by Laura Bassen and even has a quick little video. The second link is to a really cute little bubblegum machine shaker card by Jennifer McGuire which also includes a fun video. Make that 3... I just saw another shaker card at Yes, Virginia and had to add it, check her cute little shaker house card too. And now it is 4. I was revisiting my pins and found this post from a while back...another Winnie and Walter picture perfect camera shaker card. too cute! It is the second card on the post so be sure to scroll down.

ETA

I was catching up on my blog reading and Virginia Lu had a post where I just read that over at Moxie Fab World they were having a "Clicking Cameras" Challenge. The challenge closes at midnight tonight but you can enter a project you have created within 4 weeks of their original post for the challenge. And guess what? This card and post qualifies so I decided to enter it. You can read all the details here (Clicking Camera Challenge at Moxie Fab World). So now this post is ETA which stands for edited to add. Cool Huh? This will be my first entry into a Moxie Fab World Challenge. Wish me luck!

If you have made your own shaker card or seen any you'd like to share just leave me the info the comments and I'll check them out. As always comments are always appreciated. Thanks for stopping by.
Related Posts Plugin for WordPress, Blogger...